| Home |   | About |   | A Kitchen Witch? |  

Thursday, July 29, 2010

Mixed Berry Cobbler & A Giveaway!

cobbler,berry,sorghum

Mixed Berry Sorghum Cobbler!

First, I hope you are all having a wonderful day, Dearies! And thank you for all of your supportive, sweet comments left throughout the last week.

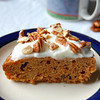
This is my mixed berry cobbler. I know it is midsummer in many parts of the world, and many of you are probably in cobbler overload. But I have to share this version for multiple reasons. The main reason is its wholesome deliciousness. I have made a few different cobblers recently with different fruit to sugar to starch ratios and, of course, an array of crumb toppings. This one is the best hands down!


Another reason is that this cobbler is made with inexpensive, organic berries from Whole Foods freezer section. Have you checked it out? A 10 oz. bag of frozen, organic blackberries is $2.69. Try buying 10oz. of conventional or organic blackberries fresh and see what you pay! So this recipe is super healthful and still budget friendly.

The last thing is that my 'crumb' topping is high fiber, low fat, and gluten-free. I can thank Claudia a.k.a. Foodessa for this feat! Claudia introduced me to sweet sorghum flour, which is an excellent gluten free flour in certain applications. I originally wanted to showcase sweet sorghum in a more fantastic way than cobbler, but after tasting this one today I no longer feel that way. You can also see Claudia's beautiful, gluten free sorghum cake that requires no xanthum gum at her blog, Foodessa! It's listed in my side bar if you are a fan of all things gluten-free.


Preheat oven to 350 degrees and spray 4 ramekins with oil.

For the topping:
1/2 Cup Rolled Oats
1/3 Cup Sweet Sorghum Flour
1 Tbsp. Light Brown Sugar
1/4 Tsp. Cinnamon
Pinch of salt
1 Tbsp. Maple Syrup or Honey
2 Tbsp. Vegetable Oil

In a bowl, mix the oats, flour, sugar, cinnamon & salt thoroughly. Add the syrup and oil and combine till you have a crumb like look to the mix. Do not over mix! Set aside.

For the fruit cobbler:
3 1/4-3 1/2 Cups of Frozen Berries*
1/3 Cup of packed light brown sugar
1 1/4 Tbsp. Corn Starch
1 Tbsp. Fresh Lime/Lemon Juice
*I used 1 bag of blackberries and then supplemented with strawberry & mango to reach 3 1/2 Cups of fruit.

Place berries in a large bowl. Measure out the sugar in a measuring cup and mix it with the corn starch. Pour the sugar mixture over the berries and distribute evenly. Add the lime juice and distribute properly. Place the berries in 4 ramekins being sure to overload the ramekin (the berries will shrink down when baking). Also be sure to scrape the sugar from the bowl over the berries. Divide the crumb topping between the ramekins. Place the ramekins on a baking sheet and bake for 25-30 minutes. Let cool for at least 15 minutes before eating.

Serve with coconut or dairy whipped cream. Enjoy!

& A Lovely Giveaway...!

I was recently contacted by The CSN stores. They are offering an $80 gift certificate to one of my devoted readers, and I'm very excited about it. CSN stores have so many lovely items from kitchenware to dining room furniture to bedding and pretty much anything else you can imagine. In fact, one of my favorite kitchen items, my Le Creuset tart pan, is from The CSN stores. This sturdy, well crafted tart pan is just one of the many examples of the type of quality kitchen and furniture items sold by CSN.

So what do you have to do to get it? Well, you can sign up as a follower of my blog or receive my posts via e-mail. The 'follow' button is at the top of this page if you'd like to do that. I'd love it if you did, but you certainly don't have to do so. *The only thing you really need to do is leave me a comment as to why you need or want this certificate. Please leave your e-mail address, so I will be able to contact you in case you win-this is important :)! I will use a random generator to pick a winner on August 5th, 2010.

Here are some tidbit facts that may apply to you:
1. This contest is open to American & Canadian readers.
2. This contest is open to bloggers & non-bloggers alike.
3. Shipping charges/international fees may apply to Canadian addresses.
4. If you are a blogger & win, it would be nice if you posted about your loot!

Good Luck!

Sunday, July 25, 2010

A Healthy Creamy Pasta

creamy pasta

This is a quick pasta recipe I found on one of my favorite blogs. The recipe is just so blog worthy, as it is very simple and super delicious. The major feat here though is a creamy pasta that is not fattening or dry. You know the scenario-you skimp on cream sauce for the hips and end up with a dry pasta dish, or you go ahead and make enough buttery cream sauce only to regret the indulgence later. Well, there's none of that going on here, Dearies!

You also get a dose of friendly flora for your digestive tract with this dish, which is something we can all use these days!


Recipe adapted a bit from Serendipity-Serves 4-5
1 lb. of your favorite pasta
1 1/4 Cup Low Fat Plain Yogurt (Organic Please!)
6 Tbsp. of Basil Pesto
2-3 Tbsp. Real Parmesan Cheese
Salt & Black Pepper to taste

Boil your pasta according to package instructions.

About 3 minutes before your pasta is done boiling, place the yogurt, pesto, and cheese in a pan on very low heat-as low as your stove can go. You're only taking the chill off this mixture, not cooking it! Whisk the mixture a bit while waiting for pasta to be done. Drain the pasta well and throw into the pan. Remove from the heat immediately and mix well. Serve with extra Parmesan, sea salt, and black pepper.

Enjoy!

Oh, & a rum shot for extra digestive help!


p.s.-I'm going to see if I can veganize this recipe for my vegan lovelies. I feel it's just a matter of finding the right plain, vegan yogurt. Hmm?

Wednesday, July 21, 2010

High Blood Pressure/Hypertension

zuc sal 4

Blood pressure is the pressure of blood leaving the heart and entering the arteries, and High Blood Pressure a.k.a Hypertension affects millions of people every year. For most people, heavy salt intake is the culprit. Too much salt in our diets causes for an osmotic situation that is never beneficial for the lining of the arteries. Tearing, due to the pressure, can result in a stroke. This causes for a loss of blood to the brain, and the damage from this event can be permanent. Stroke is also just the beginning of serious ailments that high blood pressure can cause.

An aspect of high blood pressure that is often overlooked though is potassium intake. Potassium is a mineral that aids the kidneys in ridding the body of sodium. In doing so, blood pressure lowers due to less salt in the system. Some studies even show that a potassium rich diet can lower the risk of stroke by a whopping 38%. That being said, supplements are not encouraged as they can cause kidney damage.

So here is a list of potassium rich foods, Dearies!

Potassium Rich Foods:
Baked Potatoes
Bananas
Fresh Squeezed O.J./Oranges
Zucchini/Squash
Raisins
Molasses
Spinach
Edamame
Garbanzos
Cantaloupe
etc....

To make this post a bit more personal. My Cauldron Boy visited the doctor about 5 years ago at the ripe old age of 26 years old. The nurse took his blood pressure as usual, and gasped at Cauldron Boy's pressure saying in her sweet, broken English 'I can't believe you come to doctor for eyes when blood pressure like dat!' She quickly laid him down and ran to get the doctor who said Cauldron Boy's pressure was that of a 45 year old man that just suffered a heart attack. Action was in order, Dearies!

So Cauldron Boy eats the foods listed above daily nowadays and his blood pressure is back in check. Here is a raw zucchini salad I make for him regularly that is very rich in potassium. I must also mention that posting this was inspired by Ms. Pacheco Patty. If I hadn't seen her simple, pretty beet salad looking so good, I might have overlooked even posting a salad or doing a post on high blood pressure. So thanks, Patty!

Easy Raw Zucchini Salad
1 1/2 Cups Grated Zucchini
1 Large Garlic Clove-minced
1 1/2 Tbsp. Red Wine Vinegar
1/2 Tbsp. Olive Oil
Pinch or Two of Sea Salt
Black Pepper

Toss all ingredients together. Lay the zucchini mix over your favorite organic green with whatever other vegetables you like. Then drizzle the rest of your salad with a bit of oil and vinegar too. Enjoy!

Another high potassium dish I recently made for my Cauldron Boy was from the lovely Gloria's Blog, Canela Kitchen Recipes. It is called a 'Papa Rellena'-a baked one at that. Gloria filled hers with meat and vegetable, but I just opted for garlicky spinach-yum! This tasted like a glorified Knish. I only changed the potato outside a bit by using Jilly's Flax Egg, which is an awesome egg alternative for vegans and carnivores alike.

Gloria's original Papa Rellena recipe is here


Other ways to lower blood pressure besides drastically lowering salt and upping potassium are by lowering your consumption of caffeine, alcohol, & cholesterol rich foods. De-stressing can help too, Dearies!

Saturday, July 17, 2010

Tofu Yum Yum

tofu yum yum 2

This is a dish I make for my friends that creates the illusion that I'm some type of Asian foods expert. Or at least in their 'not knowing so much about Asian foods' minds. Little do they know that I'm an amateur maker and lover of different Asian foods and styles of cooking too.

That all being said, I don't know how authentic this would be to someone from any part of Asia or to a well seasoned traveler of the Far East. In fact, I'm sure this is something I made up after learning a few different Asian dishes. Hence it is a simple dish, but it's good. Really good. And it's even better if some fresh cut cucumber and jasmine rice are thrown on the scene. Maybe some pickled veggies too if you have any. Oh, and I used organic millet as a starch in some of the photos here...


Recipe for Tofu & Yum Yum Sauce:
1/2 Block (7-8 oz.) Organic Extra Firm Tofu-patted dry with paper towels & then cubed.
2 1/4 Cups Water
1 Vegetarian Knorr Bouillon Cube*
1/4 Cup Sliced Scallion (white & green parts)
1 1/2 Tbsp. Chopped Garlic
1 Organic Carrot (sliced)
1/2 Cup Frozen Peas
1 Tbsp. Low Sodium Soy Sauce
1/2-3/4 Tsp. Toasted Sesame Oil
1/2 Tsp. Sriracha or Chili Garlic Sauce
1/2 Tbsp. Peanut or Veg Oil
2 Tbsp. Corn Starch dissolved in about 1-2 Tbsp. Water**
Serve with extra fresh cut scallion or cilantro

*Knorr is a very high sodium bouillon, which is why I don't add any salt. If you are using a low sodium bouillon like Rapunzel, taste at the end of cooking & then add salt as needed. Do not use soy sauce as salt, or you will end up with a poor attempt at any type of Asian cuisine. One could also just use 2 1/4 cups of low sodium broth for this recipe.
**Be sure to dissolve corn starch in water. If corn starch is thrown into the mix on its own, clumps will form.

Place peanut oil in a sauté pan & bring to medium heat. Add the scallions and allow to sizzle for about 45 seconds stirring if needed. Add garlic and allow to cook for another 20 seconds. Add water, bouillon, peas & carrots-bring to a boil. Allow to boil hard for about 1 minute and lower the heat to a healthy simmer. Allow to simmer for about 3 minutes more. Then add the tofu, soy sauce, sesame oil, & the Sriracha Chili Garlic Sauce. Let simmer for another 1-2 min to warm tofu through. Add corn starch and stir watching closely. Once the sauce begins to look a bit shiny and thick, remove from heat immediately. Serve over jasmine or you favorite long grain rice.

Enjoy!

Thursday, July 8, 2010

Restaurant Style Fried Rice

fried rice

This a quick recipe and tutorial on how to get perfect fried rice that has all of the fresh aromas and tastes of Americanized take out fried rice dishes. Yes, I said 'Americanized' fried rice-I love it even if it's not quite authentic to any area of China or other land that may claim this type of dish as their own. I also know many of you might secretly love Americanized Asian foods of all kinds too, as they seem cause hot and sometimes fiery discussions in culinary circles.


First, the rules when it comes to fried rice (the trinity):
1. Always use cold, refrigerated leftover rice straight from the fridge. Day old cold rice is great!
2. Resist the urge to move the rice and stir it about-this creates sticky, broken rice by disrupting the inner starches!
3. Work in batches-egg first and set aside, then veg and set aside. You can't make it all at once. Remember the chefs at the Japanese places that cooked at the table? They cook one thing and push it off to the side only to continue this process and reunite all of the ingredients in the end.

Restaurant Style Fried Rice for 2
3 Cups Cold Day Old Rice (whole grain preferably)
1 Carrot-sliced thin
3/4 Cup of Organic Broccoli-chopped
2 Organic Eggs
1 1/2 Tbsp. Garlic-minced
1-2 Tbsp. Fresh Cilantro or Scallions
3/4 Tsp. Onion Powder
1 1/2 Tbsp. Low Sodium Soy Sauce
1 Tsp. Toasted Sesame Oil
1 Tsp. Fish Oil
1/2-1 Tsp. Sriracha
Peanut or Veg Oil for cooking
pinch of salt

In a small omelet pan sprayed with Pam, lightly cook your egg. I made a light cooked omelet and sliced it. Set aside. In a large (at least 12' wide sauté pan or wok) pan, place about 1/2 tbsp. veg oil and bring it to medium heat. Sauté the carrots and broccoli for about 2-3 minutes and set aside. Make sure to scrape them out of the pan/wok creating a clean surface. *Or you could simply steam your veggies first.

Place the pan/wok back on the heat and add 1 to 1 1/2 Tbsp. of oil. Bring the oil to medium heat. Once hot, scatter the rice in the pan and leave it for at least a minute or two! Do not touch for a minute so that you hear it frying and cracking. Sprinkle with the onion powder and garlic. Now turn areas of the rice with a spatula and allow to fry on the other side making sure not to stir or move the rice too much. Let the other side cook for a minute. Then, place the vegetables on top and add the soy sauce, sesame oil, fish oil, and sriracha. Do not allow the soy to fall to the bottom of the pan as it will cause burn. Toss in the egg and cilantro. Serve hot. Enjoy!


p.s. temperature is so important for fried rice dishes being that the rice has to be allowed to fry. If the pan is too hot, it will simply burn!


Saturday, July 3, 2010

Hummus Algerienne

Photobucket

Hummus Algerienne and dishes like it are some of the first meals I ever learned how to cook for myself, which is a good thing. Good in that I never really went through the ramen noodle phase that so many young people in busy societies endure before learning how to really cook or bake. So as you might expect, this dish is quick and easy. It is also quite delicious, and you can add to it as you like.

Quick or slow stewed hummus like this is normally served with couscous, but I topped mine over organic yellow corn grits served with salted, red wine vinegar cucumber slices. Yes, the pictured dish is a true testament to my overall culinary heritage.


Note: There are an array of dishes in Algeria and throughout the Maghreb that could easily be called 'Hummus Algerienne'. This is just one of the many!

Hummus Algerienne for 2
1 Can Garbanzos (drained)*
1/3 Cup Scallion Whites (sliced)
4-5 Large Cloves Garlic (chopped)
5 Tbsp. Tomato Pulp
1 Tsp. Cumin (fresh ground)
3/4 Tsp. Paprika
1/4 Tsp. Onion Powder
1/8 Tsp. Turmeric
1 Small Bay Leaf
1/4 Tsp. Salt
2-3 Hefty Pinches Red/Cayenne Pepper or 1/2 Tsp. Harissa
1 Cup Water
*Make sure to use a canned garbanzos that are fully cooked/not parboiled.


In a sauté pan, bring about 3/4 tbsp. of olive oil to medium heat. Once hot, place the sliced scallion whites in the oil and allow to cook for about a minute. Then add the garlic and let sizzle for 30 seconds stirring if needed to avoid burn. Pour in the garbanzo beans and sprinkle with the onion powder, cumin, paprika, salt, and red pepper. Stir and allow the spices to toast a bit before stirring again (20 sec). Add the tomato, bay leaf, and water. Bring to a boil, stir, put the lid on at an angle, and bring the heat to low. Allow to simmer for about 4-5 min. Add the turmeric and immediately remove from the heat.

Salt and black pepper to taste. Serve with lemon and cilantro.


p.s. In Arabic, the term 'hummus' does not necessarily describe a dip made with chick peas. It often simply refers to the actual chick pea a.k.a garbanzo bean itself!